테스트를 거치지 않은 소프트웨어는 없습니다. 하지만 많은 기능을 가져 복잡해진 현대의 소프트웨어를 온전히 테스트하는 것은 굉장히 어려운 일입니다.
이러한 테스트를 자동화하지 않은 채 소프트웨어를 지속적으로 배포하는 것은 불가능에 가깝다고 할 수 있습니다. 이번 글에서는 카카오스타일에서 진행하는 UI 테스트 자동화 시스템에 대해 설명해보겠습니다.
테스트는 범위에 따라 보통 단위 테스트(unit testing), 통합 테스트(integration testing), E2E 테스트(end-to-end testing)로 나눠집니다. 여기서 얘기하는 UI 테스트는 E2E 테스트에 해당합니다.
지그재그 애플리케이션은 네이티브와 웹을 혼합한 하이브리드 구조를 채택하고 있습니다. Appium을 사용하여 주요 기능 및 네이티브와 웹 간의 상호작용을 테스트하여 전체 사용자 경험을 검증하고, 조화롭게 작동하는지 확인합니다.
실제 사용자가 애플리케이션을 사용할 때의 시나리오를 기반으로 테스트를 진행합니다. 사용자의 경로를 따라 애플리케이션의 주요 기능이 의도대로 작동하는지 확인합니다. 예를 들어, 로그인, 데이터 입력, 결과 확인 등의 사용자 흐름을 포함합니다.
@Test
public void testUserLoginAndInput() {
    // Login process
    WebElement usernameField = driver.findElement(By.id("username"));
    WebElement passwordField = driver.findElement(By.id("password"));
    WebElement loginButton = driver.findElement(By.id("login_button"));

    usernameField.sendKeys("testuser");
    passwordField.sendKeys("password123");
    loginButton.click();

    // Validate successful login
    WebElement homeScreen = driver.findElement(By.id("home_screen"));
    Assert.assertTrue(homeScreen.isDisplayed(), "Home screen should be displayed after login.");

    // Data input
    WebElement inputField = driver.findElement(By.id("input_field"));
    WebElement submitButton = driver.findElement(By.id("submit_button"));

    inputField.sendKeys("Test Data");
    submitButton.click();

    // Validate data submission
    WebElement resultScreen = driver.findElement(By.id("result_screen"));
    Assert.assertTrue(resultScreen.isDisplayed(), "Result screen should be displayed after data submission.");
}
애플리케이션의 하이브리드 구조에서 네이티브와 웹 간의 상호작용이 올바르게 이루어지는지 검증합니다. 이 과정에서는 웹 콘텐츠와 네이티브 컴포넌트 간의 데이터 전달과 이벤트 처리가 정확한지 확인합니다.
@Test
public void testNativeAndWebviewInteraction() {
    // Switch to Webview context
    Set<String> contexts = ((RemoteWebDriver) driver).getContextHandles();
    for (String context : contexts) {
        if (context.contains("WEBVIEW")) {
            driver.context(context);
            break;
        }
    }

    // Interact with Webview content
    WebElement webElement = driver.findElement(By.id("webview_element_id"));
    webElement.sendKeys("Test Input");

    // Switch back to Native context
    driver.context("NATIVE_APP");

    // Validate interaction result
    WebElement resultElement = driver.findElement(By.id("native_element_id"));
    Assert.assertTrue(resultElement.isDisplayed(), "Result element should be visible after Webview interaction.");
}
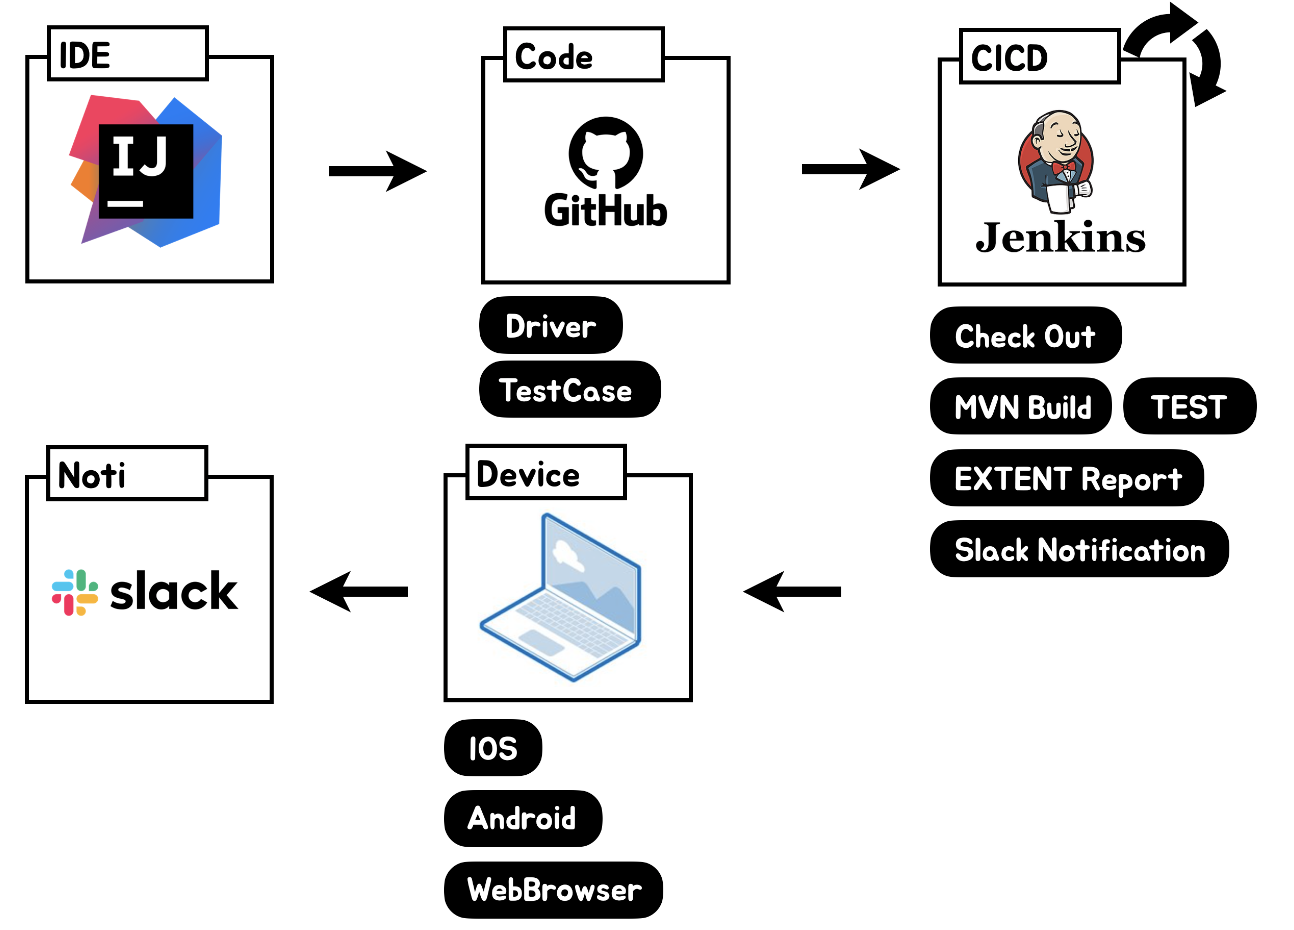
Jenkins를 사용해 코드를 자동으로 빌드하고 테스트를 수행합니다. Pipeline 스크립트를 통해 이 과정을 정의합니다.
Git 저장소에서 최신 코드를 자동으로 체크아웃합니다. 소스 코드 파일이 로컬 작업 디렉토리로 다운로드됩니다.
echo "-----------------------Code Checkout-----------------------"
stage ('Code') {
    dir("codeFile") {
        git branch: 'main', credentialsId: gitId, url: gitCodeUrl
        properties([
            disableConcurrentBuilds(),
            buildDiscarder(logRotator(daysToKeepStr: '30', numToKeepStr: '30'))
        ])
    }
}
코드를 체크아웃한 후, Maven을 사용하여 프로젝트를 빌드합니다. 이후 테스트를 실행하여 결과를 검증합니다.
echo "-----------------------MVN Build-----------------------"
stage("MVN Build") {
    dir(codeFilePath) {
        sh "${mvnHome}/bin/mvn clean package -DskipTests"
        sh "${mvnHome}/bin/mvn -Dtest=TestRunner test -Dbuild=jenkins -DappName=zigzag -Dstaging=prod -Ddevice=aos -DdeviceName=${deviceName} -DremoteServerStaging=jenkins -DremoteIP=127.0.0.1 -DremotePort=${port}"

        echo "-----------------------JUNIT Result-----------------------"
        def testResults = junit testResults: 'target/surefire-reports/*.xml', allowEmptyResults: true
        failCnt = testResults.failCount
        if (failCnt == 0) {
            echo "Tests passed successfully."
            break
        } else {
            echo "Tests failed with fail: ${failCnt}."
        }
    }
}
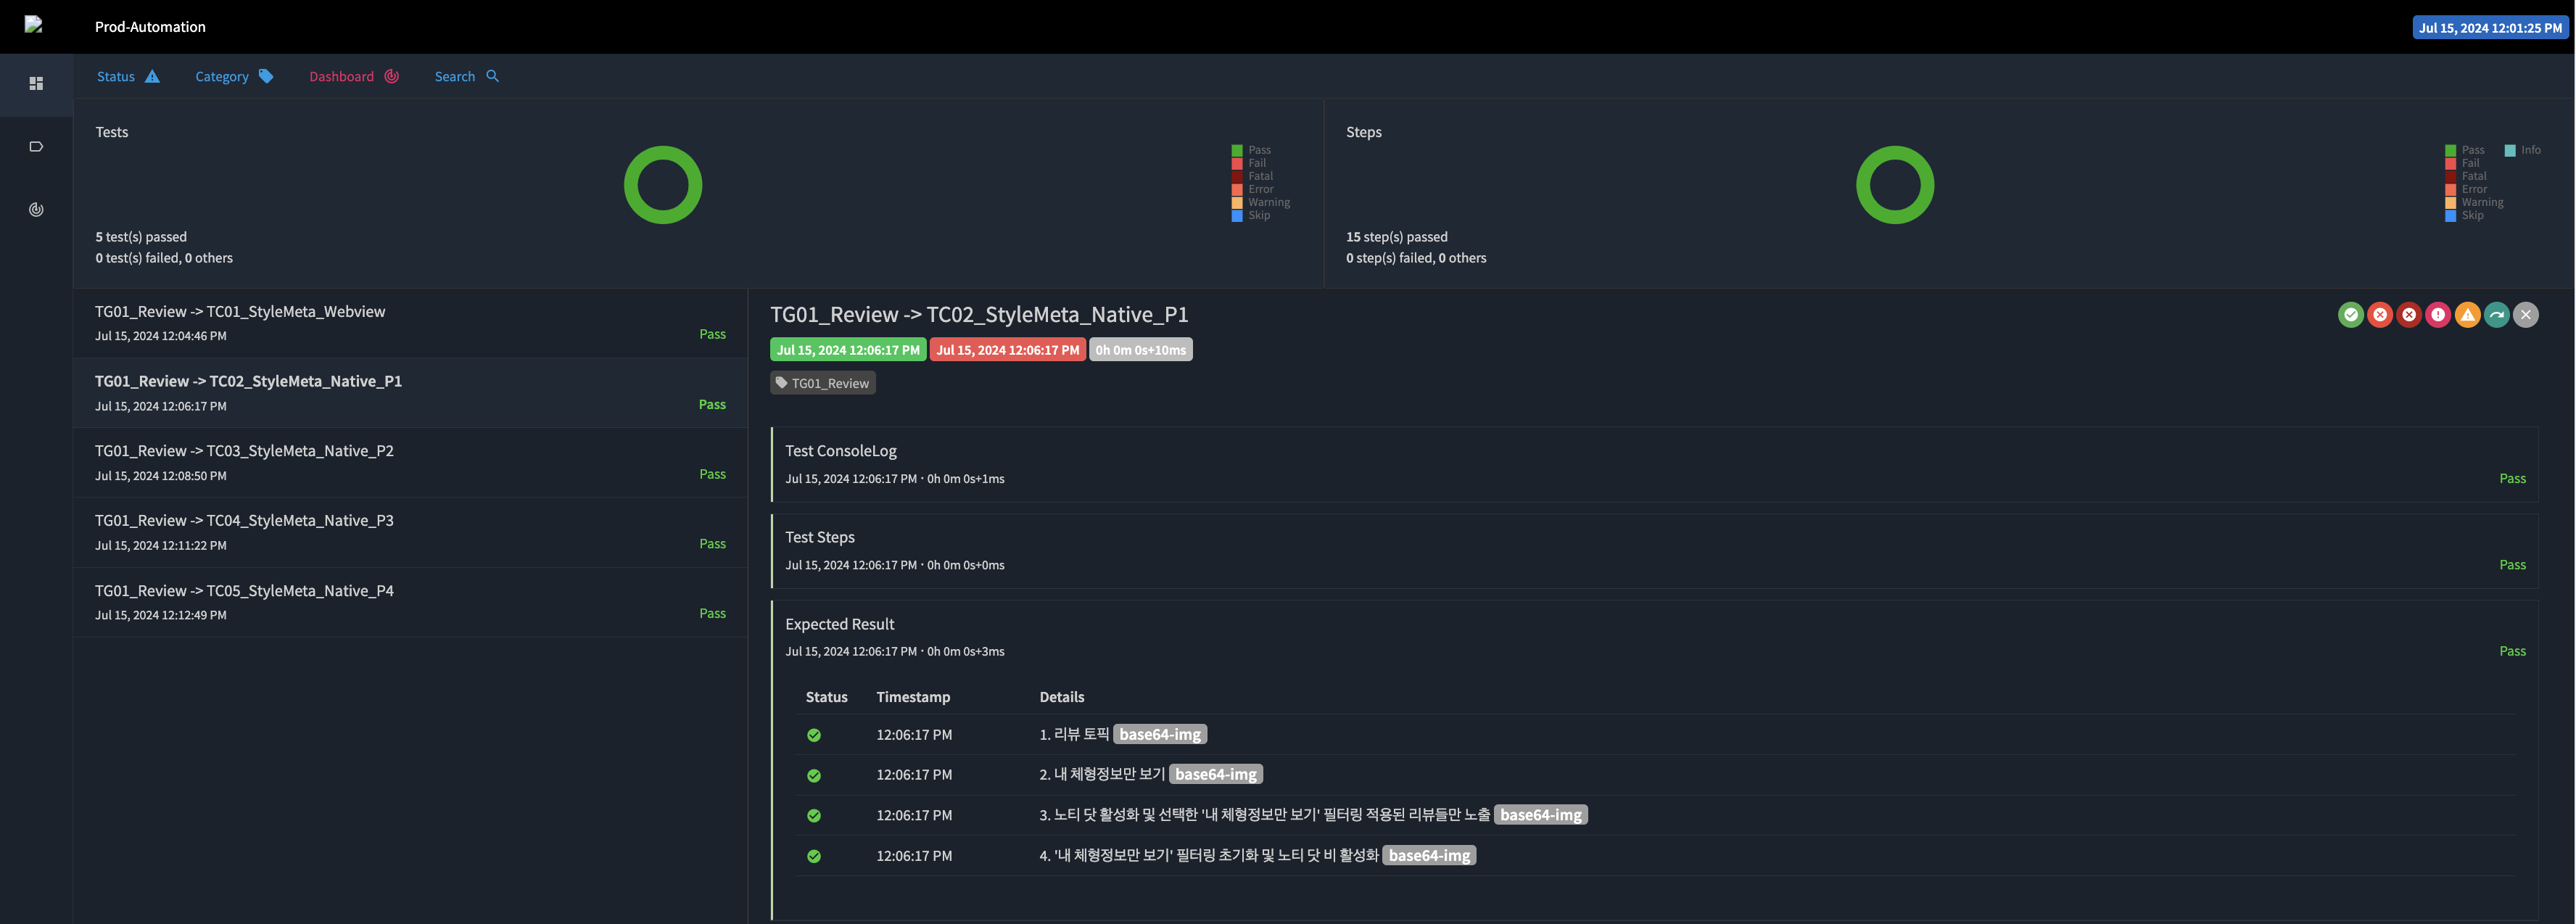
Extent 리포트를 생성하여 테스트 결과를 시각적으로 확인할 수 있습니다. 이 리포트는 웹 페이지 형식으로 제공되며, 테스트의 상태를 한눈에 확인할 수 있도록 도와줍니다.
Extent 리포트 생성을 위해서는 다음 라이브러리가 필요합니다.
<dependency>
    <groupId>com.aventstack</groupId>
    <artifactId>extentreports</artifactId>
    <version>{version}</version>
</dependency>
다음과 같이 인스턴스를 만듭니다.
const extent = new ExtentReports();
ExtentHtmlReporter htmlReporter = new ExtentHtmlReporter("<directory>");
htmlReporter.config().setDocumentTitle("Test Automation Report");
extent.attachReporter(htmlReporter);
이후 각 테스트마다 테스트 결과를 기록하면 됩니다.
ExtentTest test = extent.createTest("MyTest");
test.pass("pass");
이렇게 만들어진 HTML 리포트를 publishHTML 플러그인을 통해 Jenkins 대시보드에서 표시되도록 만들 수 있습니다.
echo "-----------------------EXTENT Report-----------------------"
stage('EXTENT Report') {
    publishHTML([
        allowMissing: true,
        alwaysLinkToLastBuild: true,
        keepAll: true,
        reportDir: reportDir,
        reportFiles: ATFnLatencyReport,
        reportName: "Automation Report",
        reportTitles: "Report"
    ])
}
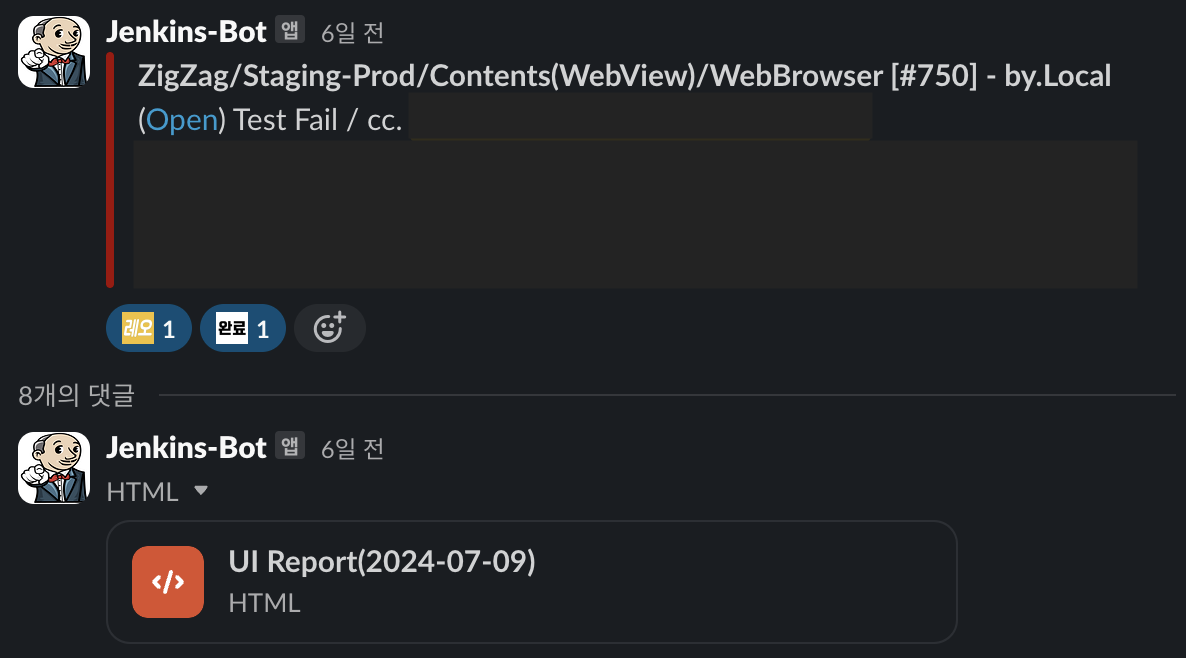
테스트 및 빌드 결과를 Slack 채널에 알림으로 전송합니다. 성공 또는 실패에 따라 적절한 색상과 메시지가 포함된 알림이 전송되며, 결과 리포트와 관련 파일이 첨부됩니다.
echo "-----------------------Slack Notification-----------------------"
stage('Slack Notification') {
    def mainColor
    def reason
    if (failCnt != 0) {
        mainColor = "danger"
        reason = "Test Fail / cc. ${mensionMe} ${mensionGroup} \n"
    } else {
        mainColor = "good"
        reason = ""
    }
    def msg = "*${env.JOB_NAME} [#${env.BUILD_NUMBER}] - by.${USER}* (<${reportURL} | Open>) ${reason}"

    def responseLatency = slackSend(
        channel: "xxxxxxxx",
        color: mainColor,
        message: msg
    )

    def fileContent = ""
    dir(notification) {
		    fileContent = readFile("summary.txt")
        slackSend(channel: "xxxxxxxx:" + responseLatency.ts, color: mainColor, message: fileContent)
        slackUploadFile(channel: "xxxxxxxx:" + responseLatency.ts, filePath: "$summary")
      }

      dir(reportDir) {
        slackUploadFile(channel: "xxxxxxxx:" + responseLatency.ts, filePath: "$excelReport")
        slackUploadFile(channel: "xxxxxxxx:" + responseLatency.ts, filePath: "$ATFnLatencyReport")
      }

      dir(notification) {
          def list = sh(script: "ls -r", returnStdout: true).trim().split("\\r?\\n")
          def successOrFail = failCnt == 0 ? "성공" : "실패"
          list.each { fileName ->
              if (fileName.contains(successOrFail) && fileName.endsWith(".png")) {
                  def tempName = fileName.replace(".png", "")
                  slackSend(channel: "xxxxxxxx:" + responseLatency.ts, color: mainColor, message: tempName)
                  slackUploadFile(channel: "xxxxxxxx:" + responseLatency.ts, filePath: "$fileName")
              }
          }
          list.findAll { it.endsWith(".mp4") }.each { fileName ->
              slackUploadFile(channel: "xxxxxxxx:" + responseLatency.ts, filePath: "$fileName")
          }
      }
  }
지그재그 애플리케이션의 품질을 보장하기 위해, 다양한 디바이스에서 테스트를 수행하고 있습니다. 초기에는 클라우드 기반의 AWS Device Farm을 활용하였으나, 현재는 로컬 장치로 전환하여 테스트를 진행하고 있습니다. 로컬 장치에는 실제 Android 및 iOS 디바이스가 포함되며, 이를 통해 다양한 해상도와 운영 체제 버전에서의 테스트를 수행하고 있습니다.
로컬 장치 사용은 다음과 같은 장점을 제공하였습니다:
이와 같은 장점 덕분에, 더욱 효과적이고 신속한 테스트를 진행할 수 있으며, 이를 통해 애플리케이션의 품질을 지속적으로 향상시키고 사용자들에게 더 나은 경험을 제공하고 있습니다.
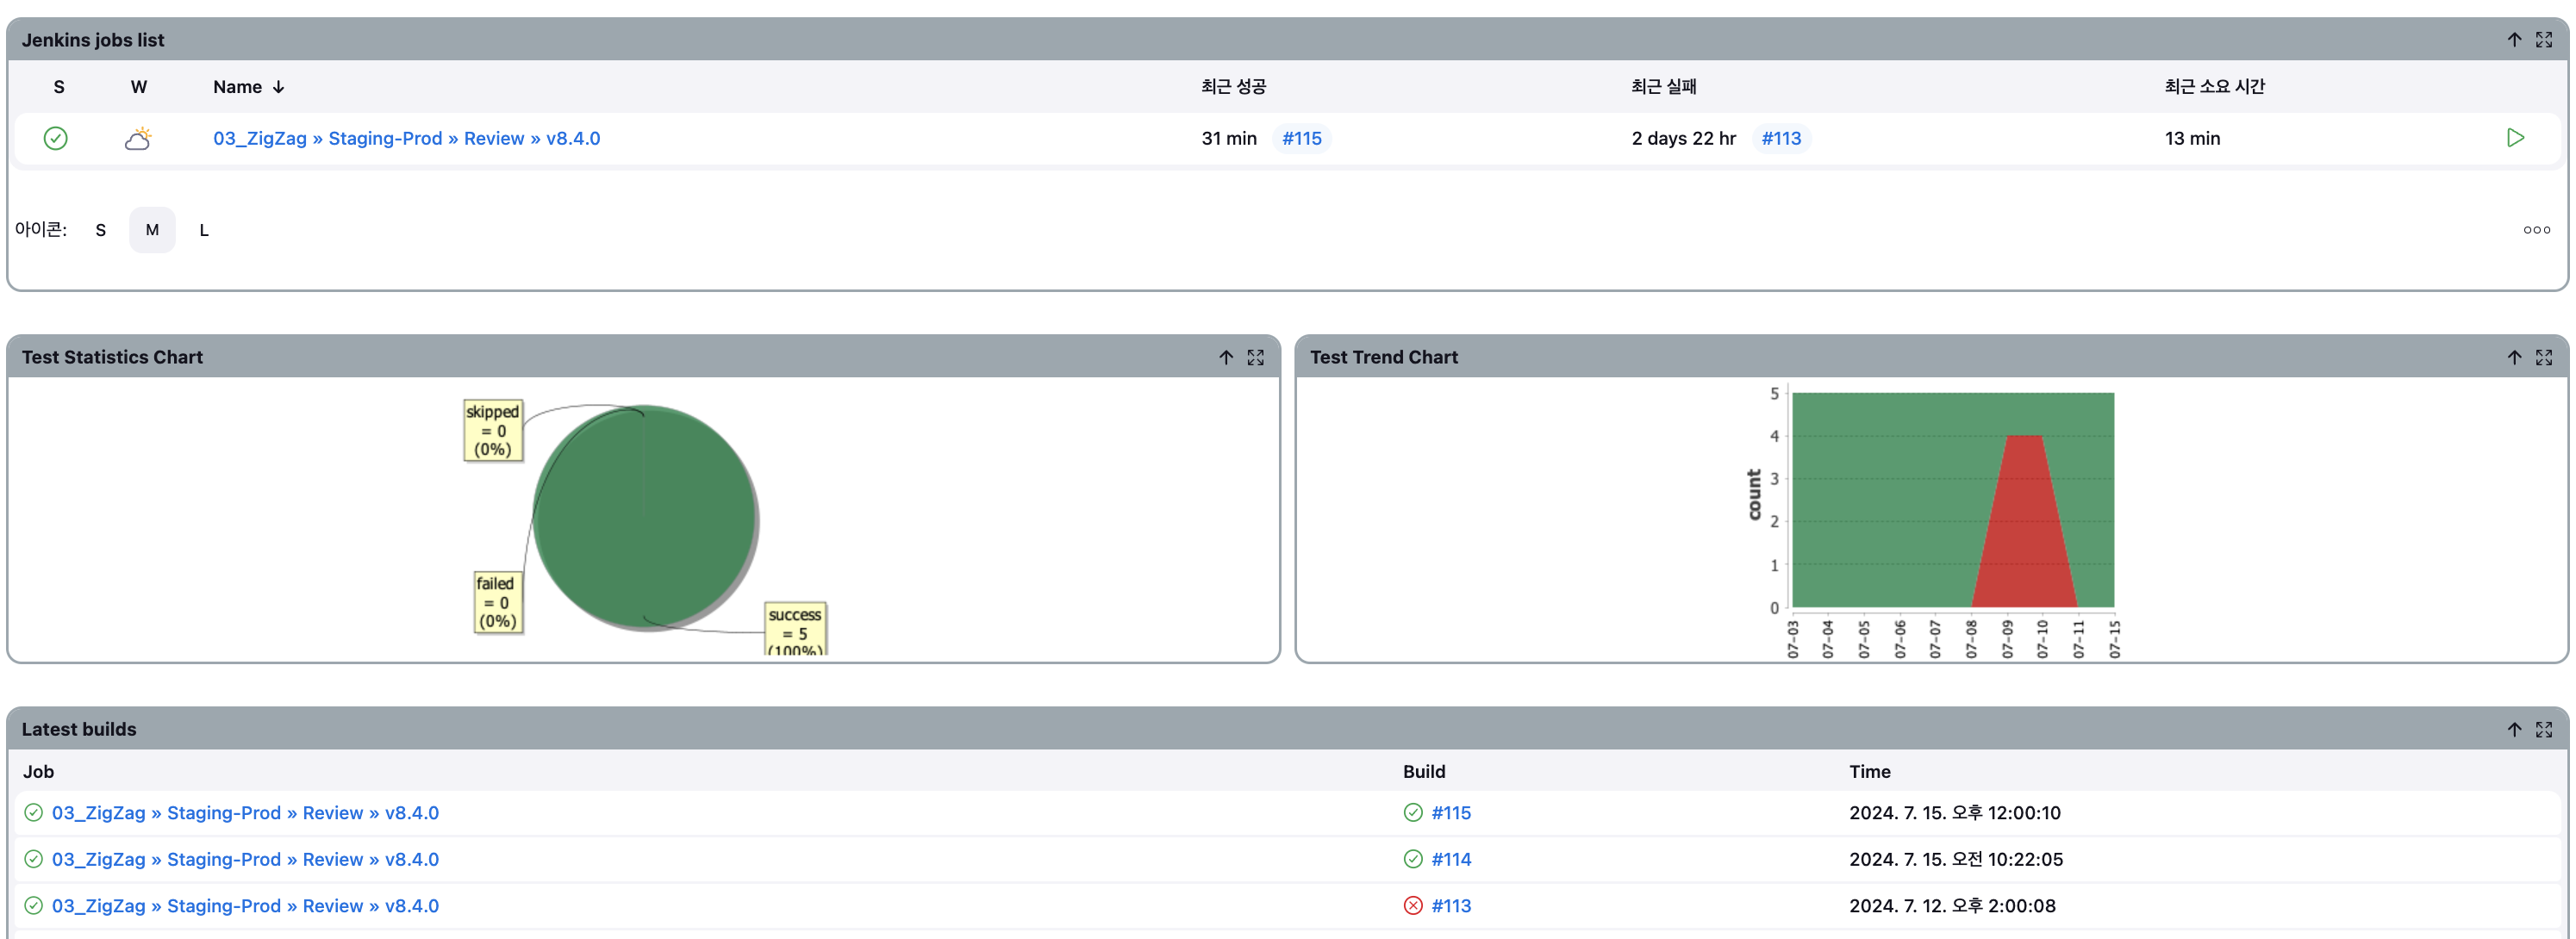
테스트 결과는 여러 가지 방법으로 제공되며, 이를 통해 테스트의 신뢰성을 확보하고 문제를 신속하게 분석할 수 있도록 지원하고 있습니다. 자동화된 시스템을 통해 테스트 결과를 슬랙 알림, 리포트 파일, 젠킨스 대시보드를 통해 시각화하고 있습니다. 각 방법의 세부 사항은 다음과 같습니다:
이 자동화 도구는 기본적으로 E2E 테스트를 위한 것이지만, 다른 용도로도 활용할 수 있습니다. 카카오스타일에서는 이 기술을 통해 주요 페이지의 성능을 측정하고 있습니다.
진입 소요 시간 측정: 각 페이지의 로딩 시간과 응답 시간을 측정하여 사용자 경험을 평가합니다.
메모리 & 네트워크 사용량 측정: 애플리케이션의 메모리 및 네트워크 사용량을 분석하여 최적화 포인트를 찾습니다.
import java.io.BufferedReader;
import java.io.InputStreamReader;
import java.io.IOException;

public class NetworkUtils {
    // 환경 변수 또는 상수 정의
    private static final String ADB_SHELL = "/platform-tools/adb";
    private static final String DEVICE_NAME = "your_device_name";

    public double getNetworkInfo() {
        String cmd = ADB_SHELL + " -s " + DEVICE_NAME + " shell xxxxxxxxxxxxxxxx'";
        String contains = "RX bytes";
        int idx = 1;

        double networkUsageInfo = 0;
        Process process = null;
        try {
            // 명령어 실행
            process = Runtime.getRuntime().exec(cmd);

            // 명령어 실행 결과를 읽기 위한 BufferedReader
            try (BufferedReader bufferedReader = new BufferedReader(new InputStreamReader(process.getInputStream()))) {
                String line;
                while ((line = bufferedReader.readLine()) != null) {
                    if (line.contains(contains)) {
                        String[] fields = line.trim().split("\\s+");
                        if (fields.length > idx) {
                            // RX bytes 값 추출 및 변환
                            info = Double.parseDouble(fields[idx].replace("bytes:", "").trim());
                        }
                        break;
                    }
                }
            }
        } catch (IOException e) {
            // 예외 처리
            consoleLog.debugWarning("Failed to execute command or read output.");
            consoleLog.debugException(e.toString());
        } catch (NumberFormatException e) {
            // 숫자 변환 예외 처리
            consoleLog.debugWarning("Failed to parse network info.");
            consoleLog.debugException(e.toString());
        } finally {
            // Process 종료
            if (process != null) {
                process.destroy();
            }
        }
        return networkUsageInfo;
    }

     public double getMemoryInfo() {
        String cmd = ADB_SHELL + " -s " + DEVICE_NAME + " shell xxxxxxxxxxxxxxxx";
        String contains = "TOTAL";
        int idx = 2;

        double memoryUsageInfo = 0;
        Process process = null;
        try {
            // 명령어 실행
            process = Runtime.getRuntime().exec(cmd);

            // 명령어 실행 결과를 읽기 위한 BufferedReader
            try (BufferedReader bufferedReader = new BufferedReader(new InputStreamReader(process.getInputStream()))) {
                String line;
                while ((line = bufferedReader.readLine()) != null) {
                    if (line.contains(contains)) {
                        String[] fields = line.trim().split("\\s+");
                        if (fields.length > idx) {
                            // TOTAL 값 추출 및 변환
                            memoryUsageInfo = Double.parseDouble(fields[idx].replaceAll("[^0-9.]", "").trim());
                        }
                        break;
                    }
                }
            }
        } catch (IOException e) {
            // 예외 처리
            consoleLog.debugWarning("Failed to execute command or read output.");
            consoleLog.debugException(e.toString());
        } catch (NumberFormatException e) {
            // 숫자 변환 예외 처리
            consoleLog.debugWarning("Failed to parse memory info.");
            consoleLog.debugException(e.toString());
        } finally {
            // Process 종료
            if (process != null) {
                process.destroy();
            }
        }
        return memoryUsageInfo;
    }
}
테스트 자동화는 많은 이점이 있지만, 한계점과 어려움도 존재합니다.
아직은 단순 반복적인 기본 기능들에 대해서만 테스트 자동화가 적용되어 있습니다. 하지만 앞으로도 지속적인 개선과 확장을 통해 테스트 자동화의 범위와 효과를 더욱 넓혀 나갈 것을 계획하고 있습니다. 이를 통해 높은 품질의 소프트웨어를 신속하게 제공하여 사용자에게 최상의 경험을 제공해 나가려고 합니다.